How to paint walls with rollers like a pro?
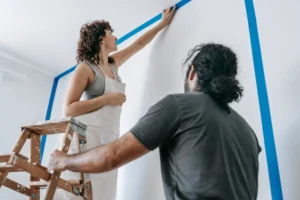
How To Paint Walls With Rollers? Many people try to paint their walls on their own without any knowledge, and as a result, it makes your interior very messy. Aren’t you making such a mistake? A beautiful wall not only enhances the beauty of your home but also enhances your mood. You can paint your interior or exterior wall with the color of your choice, that too like a professional yourself, yes this is true.
We are here for you with the best tips and advice to solve your queries related to home and gardening. How to paint walls with rollers? If you want to paint your walls with a professional touch without spending a single dollar on your own, then you are in the right place. This week’s most trending questions which our professionals will help you to solve with their best experiences are:
- How to paint a wall with a roller for beginners?
- How to paint a wall with a roller without streaks?
- How to paint walls with a roller brush?
- How to paint interior walls with a roller?
- How to paint walls with a roller sponge?
- How to paint a block wall with a roller?
- How to paint walls with a small roller?
How to paint a walls with a rollers for beginners? Follow these 5 beginners guide
It does not matter whether you are a beginner or an intermediate, or an experience, these tips are going to work for everyone. We are going to tell you how you can paint your walls in a velvety and more beautiful way without leaving any roller marks. We are also aware of the many dilemmas going on in your mind.
- Will I really get proper results with the help of these tips?
- Won’t my hard work and money go to waste?
So in easy language, let me give you a proper answer and that is a big ‘NO’ you are not going to do this at all, neither your hard work nor money will be wasted. And of course, you will get outstanding results if you follow the mentioned professional tips properly for How to paint walls with rollers. So the given below are the steps you need to follow:
1. Get a good quality bucket
So the first thing is the bucket that you will need, and we are talking about quality buckets because many times in low-quality buckets you dissolve the color, but if it gets damaged from somewhere, then you will suffer a lot. And at the first stage, your mood can be spoiled and also the time. So get a good quality bucket to start happily!
2. Load the paint roller cover with paint
This process is not overly complicated, you can dip the roller cover up to 2 inches and then load it and roll it against the screen. Today you are going to see in a completely different way how to spread paint on a wall in a similar and more effective way. As a result, you will find that there are often problems such as roller marks, hand marks, or other line marks often left on the wall.
There will be many of you for whom this will be the first experience or most of you will be those who have done this work in the beginning. Success or failure depends on your knowledge, which you will find in this article “How to paint walls with rollers” and you will be able to do this work very effectively, but there is a condition I would like to suggest to you that do not use cheap quality types of equipment just buy pro setup and good roller frame.
It is quite right to apply to paint up to 45 to 50 inches, you use the handle of a threaded broom which is best.

3. Now Professionally Roll Paint On Your Wall
Start it with a very simple method, we tell you, start by making a distance of about 1 or one and a half feet from the bottom and a gap of about 6 inches from the corner would be best to start with. Now you don’t need to do much, just move the paint roller continuously from bottom to top to spread the paint well on the wall. Like a professional, you can’t get the results in one go, you can leave the roller’s mark in several places at this stage, but don’t worry about it, just relax and with one sweeping stroke, you go on spreading the paint on the wall.
You have to try every time to keep moving forward by about 3 quarters wide of the roller, otherwise, it will be consuming a lot of time and you will get tired soon. When you reach the very corner of the top wall, you can now start painting on the adjacent wall without touching it. Now you keep repeating it step by step, for good results 1 through 3 steps will be very good until the entire wall is painted.
4. Good quality roller sleeve can provide a great finish
Good quality roller cover is an important part known as the key sleeve, and it is very effective to make your job much easier. If you want to buy, you can also buy cheap rollers, but you will have to face a lot of trouble with that. One thing is they are not effective and due to being low quality, their threads get spoiled quickly, due to which the chances of dripping paint increase. These will ultimately not paint your wall but make it less attractive as they can leave marks on your wall, so definitely avoid them.
Wool cover rollers also have many drawbacks but with some tricks, you can overcome them. This sheds the fibers on initial use so that the weed becomes deep enough, cover the new roller with masking tape to reduce shedding, and peels it to remove its loose fibers.
5. Make the paint super smooth
This rule is more precise than Newton’s law, of course, by this I mean to say the smoother you make the paint, the more it will spread on your walls and look attractive.
Now it is the turn to paint the wall adjacent to the ceiling. Let me tell you here that if you are unable to do it, then definitely take the help of a professional otherwise it can damage your roof with deep paint marks. But if you want to try it by yourself, then I will tell you a trick, you can keep the edge of the roller wet. Whether you’re rolling paint on a wall, varnishing furniture, or enameling a door, maintaining a moist edge is essential to all high-quality paint jobs.
Smooth it on after applying it: Whether they are rolling or brushing, the main error that most beginner painters make is taking too long to apply the paint. So keep this in mind in order to get the best outcome for How to paint walls with rollers?
The closest you can get: You can get a good finish only if you put a little extra effort into your painting work. Your first task is to brush the molding along the corners of the ceiling. Do this carefully, it can leave a stain on your wall and ceiling which can leave a pretty bad impression over time.
How to paint interior walls with rollers?
How to paint interior walls with rollers? It is very easy to paint the interior wall with a roller or if you are a beginner then it can be a bit difficult for you. As you know above, this process is absolutely normal and the same, let us know how to do it with the help of the video given below.
Tools that you need to paint walls with rollers
The list of things you will need for wall painting and its best results are as follows, which you can arrange before starting the things:
- Bucket
- Paintbrush
- Paint scraper
- Paint roller
- Putty knife
- Roller sleeve
- Roller screen
What else do you need?
How to paint walls with rollers? Well, we are here to solve this with our expert advice and ideas. Apart from this, all the things you may need, please also see and arrange it too.
- Paint
- Primer
- Painter’s tape
Professional instructions
Given below are some professional DIY instructions that you can follow to deal with the possible unwanted challenges to avoid mishappenings. These will help you in painting safely and beautifully. So you must follow this, and keep these things in mind while painting.
- To ensure that you have enough room to work, remove all furniture from the area.
- You need to drop the drop sheet and now clean your wall with sugar or soap whatever is available this will give you a pro result after painting.
- Cover your trim so you can cut it in. Cutting in is a painting method where you use a brush or application pad to paint in spaces that a roller can’t reach.
- Don’t submerge your paintbrush all the way into the bucket, instead dip the brush a little more than halfway through
- The paint remains very condensed at times which can lead to a crust later, so smooth the paint, you can use thinner.